The Model J-2 Prototype.

Half the cost and twice as easy to build as the Revision H!
The full plans for the construction of this unit have been published in THE MAY AND JUNE ISSUES OF THE LAPIDARY JOURNAL.By using Print Media, our non-net friends will also have a chance to build this.
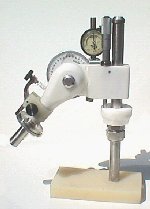
The original mechanical prototype.
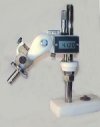
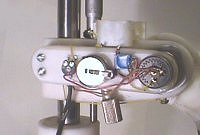
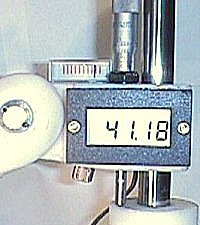
The electronic version with digital angle readout and the Beale/ Wooley depth of cut indicator. This simple device measures the contact resistance of the angle stop and stop pin, and can resolve better than 100 microns if properly designed.
UPDATE!!!!!
Why work? Someone posted THIS on the digest list! A 0.1° digital protractor for $39.99!!!!
The mechanical Version has been fitted with a dial indicator depth gage.
1: Introduction:
Faceting machines have two basic parts. The base is a flat plate, sometimes slotted to accept the mast of the faceting head assembly.
The base contains a motor, preferably a variable-speed and reversible type. 1/5 Horsepower provides adequate torque for an 8" lap. An arbor on which the laps are mounted must run parallel to the base for best faceting accuracy.
A splash pan or shield is fitted because of dust and spray from cooling water.
There are plans online for building this part. See below.
The faceting head is the most complex part of a faceting machine, but can be built by anyone with good mechanical ability. The faceting head holds the mounted ("dopped") stone at the correct position, in angle and in rotation (Index) to the lap so the facets can be accuratley cut and polished.
In 1997, plans for a faceting machine were published on the Web at http://www.gearloose.com/why.html.
Since then, dozens of people have built the machines and many have taken up faceting because of their successful project. The machine detailed on the web site required some tricky machining and assembly…the last one built here was in stainless steel (On right), though many builders chose to make them of aluminum.
The purpose of this project is not to produce a "Free Faceting Machine. It is a fair amount of detailed work, so you will earn it. One can obtain a lot of satisfaction from building these units, because they can then provide many years of an enjoyable (And for some, profitable) pasttime.
Yes, money can be saved. Many people who have built these have done so because they wish to replace an old, worn unit, or one they have not been satisfied using.
Consequently, about half the people who elect to build this will already have a machine base. People wishing to build the motor, lap arbor, and baseplate assembly can obtain instructions online at the above URL.
It was preferred to develop a design that was much cheaper and easier to build. The earlier "Revision H", for example, required the use of an expensive linear ball bushing. Because of the worldwide nature of the Web, many people in Australia, Russia, etc., had difficulty obtaining parts, and when they could find them, were dismayed to see the prices.
This design uses Delrin® polyacetal polymer for the following reasons: It can be manufactured by injection molding, should it ever be required. It has a low coefficient of friction so the expensive mast bearing can be eliminated, it is noncorroding, abrasion resistant, and unlike many "plastics", has good dimensional stability. It is easier to machine, almost pleasantly so, and can be worked well with "home" tools, like disc sanders and routers.
Delrin® is a Registered Trademark of E.I. DuPont Corporation. It is now also manufactured by other companies and is sold generically as polyacetal.
The machine is a "mast" type, the most commonly manufactured commercial type. The unit is based on readily available industrial parts. Because gemcutting generates mists from the cooling water, stainless steel or aluminum is used for exposed metal parts.
This article will discuss how to build the basic machine, with a mechanical protractor. The unit illustrated above is equipped with a digital angle readout, which can be added later for about fifty dollars in parts. These plans are available online. The components illustrated are so machined that the digital addition is reasonably simple.
Parts and materials were chosen which can be bought online or by mail order, so that the builders who live away from cities will have an easier time. Most of the parts and materials are available from McMaster-Carr Supply Company, though often people will find local suppliers. The very resourceful have frequented used machinery places, junkyards, and surplus dealers.
2: Tool and skill requirements:
The writer is not a machinist! (A fortunate purchase of a used South Bend lathe notwithstanding!). A professional machinist would not be challenged by the design. It could probably be done in a day. You will need access to a metal lathe. A milling machine is helpful, but good fixturing with a router will work.
This is not a Beginners' Project. By its very end use, the machine is intended to produce faceted gemstones of high precision, and it cannot produce something more precise than it is.
Familiarity with mechanical principles is needed to complete this project. Proficiency with mechanical assembly practices and the use of common shop tools is required.
For those unfamiliar with the operation of machine tools such as lathes and milling machines, it is best to get help from a machinist, toolmaker, or other skilled craftsperson. Often, a local trade school can help greatly.(Sometimes they are grateful for a "special" challenging project). Of course, you will have to pay for materials and supplies at the least.
Another possibility is to enroll in a basic machine shop or metalworking course. The skills will not be wasted, as later, you can make your own laps and other tooling, saving many times the cost of the course.
A few builders of the previous revision found a rare and wonderful resource- A machinist whose significant other likes jewelry! It may cost you your first emerald.
3: Working with Delrin®:
Delrin® and many other polymers can "spring back" when critical dimensions are machined. Sharp cutting tools must be used so that the cutting forces do not temporarily deform the material. Delrin may be finished and polished beautifully by careful sanding, followed by fine steel wool, finished by buffing. The finished result resembles porcelain.
The design can be transferred, traced, or constructed on the block of Delrin®. The outline can be easily cut with a bandsaw, coping saw, or saber saw.
4: The Components:
The Mast:
The mast uses a flat plate of Delrin® or aluminum, into which is pressed a precision centerless ground ľ" diameter hardened stainless steel rod. Because this is a press-fit, the accuracy of the bore diameter is important. The plate has a milled or routed slot, through which a bolt attaches to the machine base. This allows the faceting unit to be moved toward or away from the lap, and allows it to be swung to different angles. The critical assembly of this piece is to guarantee that the rod is perfectly perpendicular to the base of the plate. An easy way to insure this is to face the bottom of the plate after assembly by chucking the mast rod in the lathe. Otherwise, a drill press or milling machine that has been indicated to insure perpendicularity may be used.
The Mast Follower:
The critical dimensions of this piece are the bores for the ball bearings and the perpendicularity of the centerline of these bearing bores and the planes of the milled surface and the centerline of the mast bore. The bearing bores are machined to a light press fit. The bearings can be replaced if needed, but in many years of use with earlier revision facet heads, the design of a paired set of preloaded bearings is "Massive overkill". Since the bearings operate slowly and under light loads, are are sealed type bearings, failure is unlikely.
The bore that forms the mast bearing is critical. The assembly must move smoothly up and down the mast without binding, but must not allow slop. The plain front of this part is the correct size for mounting the Digital Panel Meter, should you elect to add this option in the future.
A micrometer spindle is mounted on this part for making fine adjustments to cutting height. Micrometer heads may be purchased, but it is often much cheaper to find one of the many inexpensive micrometers which are being imported now, and simply rework it. You will need to extend the micrometer shaft so it is 2 ˝" long. This can be done with a simple Ľ" shaft coupling and a piece of drill rod. The ˝" through bore will allow the shaft coupling to fit. Round off the bottom end of the shaft extension so it will bear and move smoothly on the Delrin coarse height stop, which serves as a bearing.
A ˝" dowel pin is pressed into a bore on the far side of the mast follower block. This serves as a "hard stop" for the angle setting. It can also serve as one electrical contact of the Beale-Wooley Ohmmeter, used by many for critically accurate cutting.
The Angle Head:
The bores for the quill bearings are critical, as is the perpendicularity of the angle shaft bore to the milled flat surface. The outside radii are finished by hand on a disc sander, then sanded and polished to suit the builder.
The Quill Shaft:
This part accepts the dopped stone and defines the center of all stones you will cut. This is the heart of the machine. The shaft forms a bearing component with the needle bearing assembly, so take your time on this piece. The index gears mount to this piece.
Index gears may either be purchased from lapidary equipment dealers, or made from commercial gears. Any gear that has a nominal diameter of 2", and a ˝" bore will work.
The first index gear you should get is a 96 tooth gear. This allows stones with 3,6,8,16, or 4 sides to be cut. The next most frequently used is a 64 index. I prefer to drill two holes as shown on the drawing, and mount the gear with small screws, as they can never slip, but many commercial index gears simply use a setscrew.
The Index Pawl and Cheater:
The pawl is the latching device that engages the index gear. The "Cheater" is a fine adjusment that allows positioning the stone in the rotation axis a tiny amount to correct for index gear errors, or for some sophisticated meet point designs, or for repairing stones chipped or worn in daily wear that were cut long ago, or somewhere else freehand.
With an accurate index gear on a properly aligned machine, on most simple cuts the need for its use is infrequent. Beginners sometimes get into a bad habit of using it too frequently, introducing cumulative errors as they go around the row of facets. This is called a "Cheater Chase".
The design uses a simple trick to produce a worm gear and wheel, forming the gear teeth onto the Delrin quill housing. When the cheater housing is mounted to the quill housing, a Ľ-20 tap is simply rotated in the Ľ" bore. This makes the cheater housing "crawl around" the quill housing as it cuts the threads. The trick is to use a bushing on the tap so it serves as a thrust bearing. This prevents the tap from moving, forcing it instead to make the cheater move as the threads are cut. Facing the quill shaft, form the teeth from the "10 O'Clock" position to the "2 O'Clock" position. This will allow sufficient travel with plenty to spare. The result is a smoothly operating fine adjustment, with enough friction so it does not drift.
The index pawl and its shaft are mounted on a Delrin® piece assembled to the front of the quill housing of the angle head.
The cheater adjustment shaft is a simple knurled-headed bolt, secured in the cheater housing with a Nylock locking nut. A slight preload exists on the knurled bolt so the cheater will not move on its own, and will retain its setting.
The Angle Stop:
The angle stop is a simple clamping device that locks to the angle shaft.
It moves with the angle head, and rests against the ˝" dowel pin in the mast follower assembly. The 1" hole is bored prior to sawing and sanding the outline and before sawing the clamping slit. It may be made of aluminum or brass for ease of fabrication.
The Coarse Height Stop:
This is a simple clamp and bearing that is placed on the mast. It can be rapidly moved for large changes in height, such as going from the girdle to pavilion positions. The micrometer spindle extension rides on this Delrin® surface.
5: Assembly:
On a grinder, or with a hand grinder, slightly roughen a ˝" ring on the very end of the ľ" stainless centerless ground rod that serves as the mast. The purpose is not to reduce the diameter, but to provide a surface into which the Delrin® can creep under strain so the shaft is rigidly locked. (This step is not needed if you elect to make the base from aluminum tooling plate, as it will be "chilled" in place, rather than pressed.) Press or carefully drive with a wooden mallet or lead hammer this end of the ľ" diameter rod into the Delrin® base. True the base of the Delrin® piece on a lathe or miller so that it is perfectly square to the mast shaft. This step corrects any errors from boring the hole from a misaligned drill press, or errors caused by cocking of the rod during pressing.
If you elect to make the mast base out of aluminum, you can chill the shaft into the bore by heating the aluminum in the oven to 300 F. Quickly force the stainless ground shaft into the ľ" bore. It will NOT come out. As with the Delrin, and particularly since the aluminum has been heated and cooled, the bottom of the base should be trued as mentioned above.
Assemble the ˝" ball bearings Into their respective bores on the mast follower. Install the micrometer head into the mast follower.
Install the protractor disc onto the angle shaft, numbered side towards the threaded portion.
I did not specify a protractor because most local hardware stores sell level devices that have a swinging pointer. The scale is 3" diameter, just right for this application, for about $8.
One is shown on the picture of the Revision H, the early stainless steel model illustrated on the web site. Places like Berg and Pic Design Components sell beautiful black anodized protractors that have been engraved. They cost $30, and there are matching vernier pointers available for them.
Install the protractor and washer and shaft assembly into the ˝" bearings-It should be a light press fit.
The washer is a simple ˝" bore washer that spaces the protractor away from the mast follower so it does not rub. Using a ˝-20 Nylock nut, adjust the bearing preload so that there is no "play", but so the angle shaft turns freely.
Mount an appropriate reticle or other pointer on the top of the mast follower so the angles can be read accurately.
Once the protractor is mounted and calibrated, you can drill a 1/16 hole in the protractor disk, and through the large diameter of the angle shaft.
This allows a roll pin to be inserted, rigidly locking the angle axis into permanent calibration.
Assemble the needle bearing onto the quill shaft inboard ˝" section. Press the Ľ" ball bearing onto the small diameter of the quill shaft.
Lubricate the needle bearing assembly with light grease such as Lubriplate.
Press the assembled quill shaft with its bearings into the stepped bore at the front of the quill housing. Verify that the shaft spins freely without binding.
Assemble the angle head to the mast follower by pressing the threaded ˝-20 shaft through the bores of the ball bearings. Attach the nut, and tighten so that the ball bearings are slightly preloaded, taking care not to overtighten the nut. The angle head should swivel freely. If the bearings are properly preloaded, there will be zero "slop" or lash in the assembly, and it will remain zero indefinately. The Delrin has some resilience, so there is elastic loading.
Prior to calibration, note the 1/8" hole in the bottom of the angle head. Drill this hole continued into the metal of the shaft and insert a 1/8" roll pin. The angle shaft and angle head must never slip in relation to each other, or calibration will drift.
Assemble the coarse height stop onto the mast and lock it a few inches above the bottom of the mast.
Place the faceting head assembly onto the mast and verify that the sliding fit on the mast is smooth, but firm, without play or slop.
6: Calibration and Adjustment:
With the mast base bolted or clamped to a flat surface, place an accurate Ľ" rod, preferably a precision centerless ground one, or a drill blank, into the bore in the quill.
Obtain an accurate Drafting Triangle, 45,45,90.
Elevate the faceting head so that the rod can be placed against the hypoteneuse of the triangle. Set the protractor dial so that it reads exactly 45 degrees.
You can place a light behind the triangle and the test rod and observe the tiny crack of light to insure the angle head is exactly at 45 degrees.
Drill a 1/16" hole through the end of the angle shaft so that it intersects the protractor dial, as mentioned earlier. Press in the roll pin. This positively and permanently locks the protractor in calibration.
Insert a 1/8" roll pin into the hole previously drilled in the quill housing so as to lock the quill in the thrust direction. This prevents it from coming out. The roll pin intersects the inner Ľ" ball bearing assembly.
7: Major Purchased Parts:
Delrin, 1 ˝" X 2" wide, 1 foot required: McMaster-Carr Stock # 8739K65 $33
Bearing, Ball,"R8", 2 each: Double Sealed, ˝" bore: McMaster # 60355K89, $4.22
Bearing, Ball, Open,"R4", Ľ" bore, McMaster#60355K13, $2.82
Bearing, Radial Needle, Single Sealed, ˝" bore, McMaster # 5905K43 $7.07
Shaft, Precision ground, 60 Case Stainless Steel, McMaster# 6253K62 $22.55
